This tool is intended to demonstrate the use of the WebAPI, a network interface which has been integrated into the Avolites consoles since Titan version 10 (summer 2016). By simply sending a handful of HTML requests you can control many of the consoles' features, thus effectively controling your lights.
While you can start by simply typing some commands into your browser's address bar, this soon gets annoying, since the browser always (hopefully) jumps to a blank page. Also, it is hard to get an impression of what you can really do with this interface when you can only see a single command's result at a time.
By using this little tool you can try a number of commands in quick succession. This is greatly simplified by suggesting meaningful values. Also, you can toggle to 'Example'-mode which hides the cryptic command fields, giving you an impression of what you can do with this interface and some little JavaScript code.
The code itself is, by purpose, being kept very simple. No fancy libraries are used, no frameworks add their chic - everything, including JavaScript and CSS styles, is just in one file: index.htm. This should make it easy for you to identify the commands and routines which you need. And of course you can re-use the code in your own project - and of course you are free to use whatever library or framework you like.
An Avolites console.
The Web-API is only available on Avolites consoles from the Titan Mobile on upwards - is is NOT
AVAILABLE for the Titan One or the Titan Simulator.
A computer, networked with your console.
Well, if you can read this text, you'll probably do so on a computer of some kind. If you connect
this, using a network cable, with your lighting desk, then you're mostly there. Part of this process is
also to set proper IP addresses, but this is covered in the Titan manual. In fact I used a Titan
Mobile when creating this tool, and the two notebook computers (my development machine, and the one
running Titan Mobile) were talking to each other via WiFi, in the address range 192.168.178.x
Display resolution shouldn't be much smaller than 1400x900px - else, many elements and information wouldn't be visible.
A web browser.
Again, if you can read this text, you'll probably do so with a web browser, with JavaScript enabled.
However, this question is somewhat delicate, since all current browsers differ in some details. When
programming this tool I used Google Chrome as reference browser - hence I am sure this works in Chrome,
and it looks as intended. It also works in Mozilla Firefox and in Microsoft Internet Explorer (I tried
an old version - 10 - and hence believe it might work in newer versions, too), but the layout is
slightly off.
Please accept that I didn't effort to make this example 100% cross-browser compatible - in real life, you will optimise your project for your very needs. However, if you wish to contribute some fixes, please drop me a line, and I'll be happy to integrate your patches.
And now, point your browser to /WebAPI_Demo/index.htm and have fun.
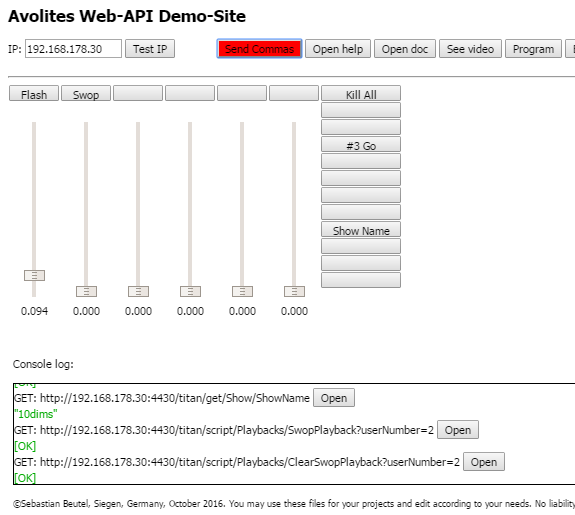
The main layout has three regions:
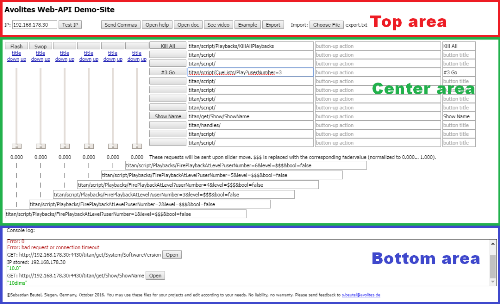
All three areas are explained in the next sections.
The bottom area holds probably the most important part of this site: the console log.
Here, all sent commands/requests are displayed, as well as the response:

The leftmost control in the top area is for the IP address of your lighting desk: enter it in the form aaa.bbb.ccc.ddd, e.g. 10.0.0.1, 2.157.163.12, or 192.168.178.10. If you then click on the button the address is stored locally so that you do not need to enter it again each time, and an attempt is made to reach the console's Web API and get its software version. Have an eye on the console log: if you input an invalid IP address then you are being shown an error:
IP adress not valid: 192.168.178.30f
And if the address is correct, but your lighting console is not available, then - after some seconds - it looks like this:
GET: http://192.168.178.31:4430/titan/get/System/SoftwareVersion
IP stored: 192.168.178.31
Error: 0
Error: bad request or connection timeout
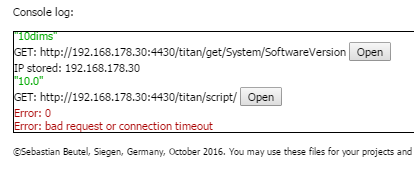
However, if the address is correct and your lighting desk is available, then the answer is just
the software version, like so:
GET: http://192.168.178.30:4430/titan/get/System/SoftwareVersion
IP stored: 192.168.178.30
"10.0"
The next control is the toggle button: if you click this, then the button turns red, to show that it is active, and float numbers in the requests are being sent with commas instead of decimal points. This is in order to circumvent problems with number format settings on the target machine - if a command like FirePlaybackAtLevel?userNumber=5&level=1.00&bool=false hasn't the expected result then most likely you need to activate 'Send Commas'.
The button opens this window showing the online help - you'll have most likely already found this.
opens the API documentation in another tab. You can find this documentation at http://api.avolites.com. This documentation lists all available commands/requests, with short explanations - it is THE ressource for you.
opens another tab with the initial video where the fabulous Oliver Waits shows the web API for the first time. You can find this video on Youtube at https://www.youtube.com/watch?v=kz_jUGAY4_U.
The / toggle button hides/displays most of the input fields in the center area. This way, you can easily get the impression of a neat little remote interface once you have set all the commands and button titles.
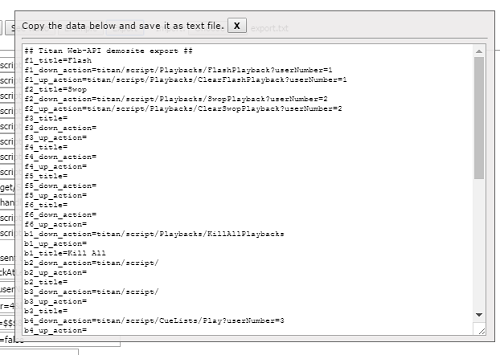
Clicking on opens a text field showing all your settings. Copy its contents
and save it as text file if you wish to re-use your settings. Close this textarea again with its designated
Close-Button .
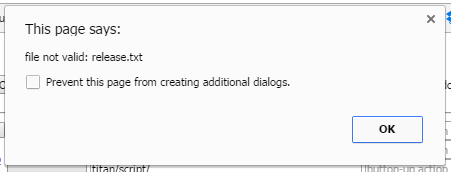
The file browser (e.g. - depending from your language) lets
you choose a file to import settings from an earlier session. It needs to be a plain text file with the
contents like it is created using the button - see above. If you
attempt to import a file in the wrong format, you will get an error prompt:
The various control elements in the center area are explained in the next sections. Currently there are buttons and faders. For each element you can define its function (i.e. the request which is sent), and for the buttons you can also define their respective title.
There are 6 faders, and you can freely define the request which is being sent once each fader is moved.

The easiest way to find your way with this is to play with the example value which is set in the input fields:
titan/script/Playbacks/FirePlaybackAtLevel?userNumber=6&level=$$$&bool=falseAs stated above the input fields, the "$$$" is being replaced with the fader value (normalized to 0.00 ... 1.00 albeit being calculated in 256 steps). Just move one fader and observe the result in the console log:
GET: http://192.168.178.30:4430/titan/script/Playbacks/FirePlaybackAtLevel?userNumber=5&level=0.992&bool=false
GET: http://192.168.178.30:4430/titan/script/Playbacks/FirePlaybackAtLevel?userNumber=5&level=1.000&bool=false
[OK]
[OK]
Please note that the trailing part of the request ("http://192.168.178.30:4430/") is automatically added to the
request string in the input field - you do not need to bother with this. In turn, each time you send a request
(in the case of a fader: each time to move it), the ip address and connection is checked - and if there are
problems, you'll see this in the console log:
IP adress not valid:
If you use the command above to send the faderlevel as parameter but nothing happens on the desk then try the button. For a brief explanation see the section "Top Area".
There are 12 buttons to the right of the faders.

For buttons, you have three input options:
The first request string is prefilled with "titan/script/" because this is what most commands would start with, e.g.
titan/script/Playbacks/KillAllPlaybacksin which case you simply add "Playbacks/KillAllPlaybacks". Of course you can overwrite this, e.g. for a command like this:
titan/handles/Playbacks/1In either case, as explained for the faders, the trailing part of the request ("http://192.168.178.30:4430/") is automatically added to the request string, and the console log displays the complete request as well as reponse or error.
The second input field is not prefilled, in order to avoid unnecessary request errors when using onclick-only commands. However, both request input fields show a hint/placeholder if empty: button-down action resp. button-up action.
Note that there is no dynamic for the request's parameters, as like the $$$ mechanism for the faders. Hence, you could use a command like
Playbacks/FirePlaybackAtLevel?userNumber=5&level=1.000&bool=falseto always set a particular playback at full (or to another - static - value) once the button is clicked.
In order to give each button a distinct name (strictly: a title), use the smaller input field, which, if empty, shows the hint 'button title'. When you enter something, simply hit <ENTER> or <TAB> or just click outside the input field in order to take over your input.
There are 6 buttons on top of the faders.
 They are completely independent from the faders - you can assign them any function you like. Of course
they are particularly useful for functions which are related to the faders, though.
They are completely independent from the faders - you can assign them any function you like. Of course
they are particularly useful for functions which are related to the faders, though.
While these buttons behave exactly like the buttons to the right of the faders, the way to define request strings and title is different. However, the result is exactly the same, and if you ever come to code your own project, you have the choice to use either solution, or create another one.
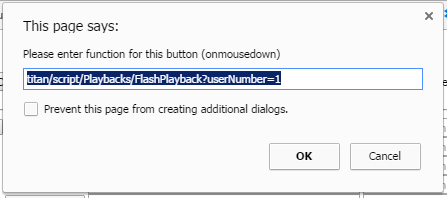
In order to set a button's 'click' function (onmousedown) you click on the link down underneath the button, while clicking on up sets the 'release' function (onmouseup). Either click opens an input prompt where you can define the button's request string (again, "titan/script/" is prefilled):
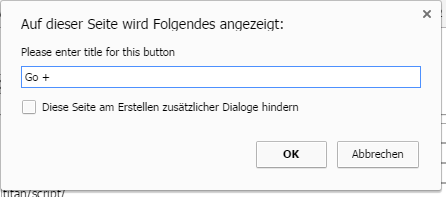
In order to set a button's title you click on the link title underneath the button. This opens an input prompt where you can define the button's title:
Once all the functions you wish are assigned, simply click on the button Example in the top area. This hides all input fields, and the result may look like this:
Some hints:
?userNumber=1&level=0,000&bool=falseit might happen that the "&" (Ampersand) translates to "&" (the HTML entity). I observed this behaviour a few times, but couldn't yet make out the root of it. Simply be advised that this might happen, and correct it manually if required.
This tool was created by Sebastian Beutel in October 2016. No liability, no warranty.
All rights reserved, however, you are explicitely free to use any part of the code, or the whole script, for
your own projects. Any feedback is highly appreciated.
Any part of the code may change at any time - updates may occur without any notice. However, I am striving to
update this helpfile, or issue an accompanying release document, with any major change.
This helpfile was last updated 12.10.2016, to reflect changes in revision 3~7.
If you have any specific question, please send an email to Sebastian Beutel.